Appearance
Mixtures
A Mixture is the heart of Hydro-Calc. It is a recipe that combines your Substances to achieve a specific Nutrient Target.
What does a Mixture contain?
A mixture is more than just a list of ingredients. It contains all the information needed to create a complete nutrient solution:
- Name and Description: To help you identify and organize your mixtures.
- Volume: The final volume of the nutrient solution (in Liters or Gallons).
- Water Quality Profile: The source water to use as a base.
- Nutrient Target: The desired final concentrations of nutrients.
- Substances: The list of substances to be used in the mixture, along with any constraints (e.g., limits on the amount to use).
- Solution: The results of the optimization, showing the calculated amount of any substance to use.
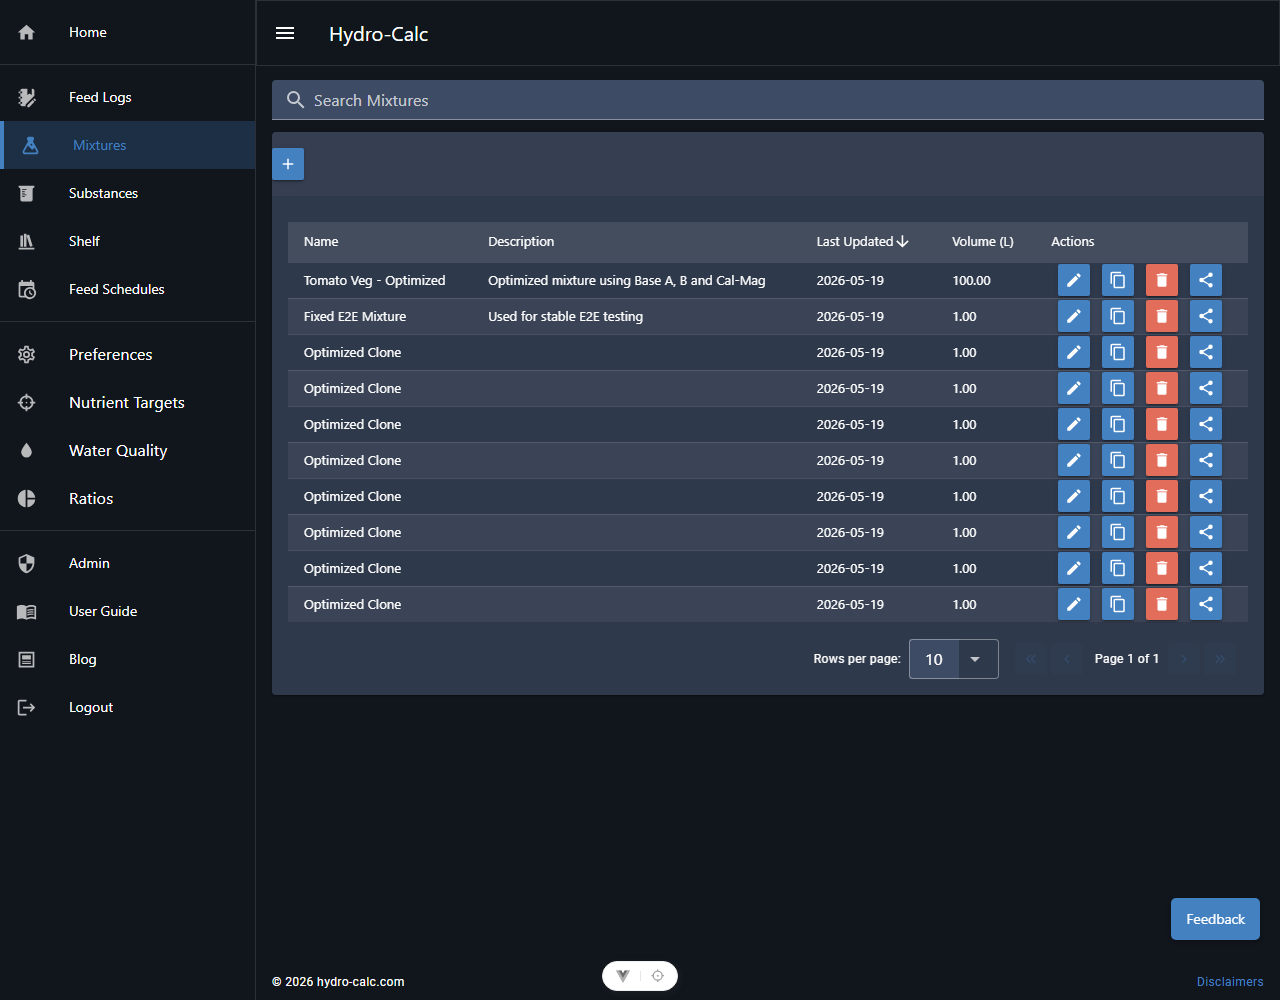
Managing Your Mixtures
The Mixtures page is your command center for all your recipes.
- Sorting: You can sort your list by Name or Last Updated date by clicking the column headers. Your sort preference is automatically saved.
- Quick Edit: Simply double-click on any row in the list to instantly open that mixture in the editor.
Creating a New Mixture
To start a new recipe:
- Navigate to the Mixtures page.
- Click the "New Mixture" button in the toolbar.

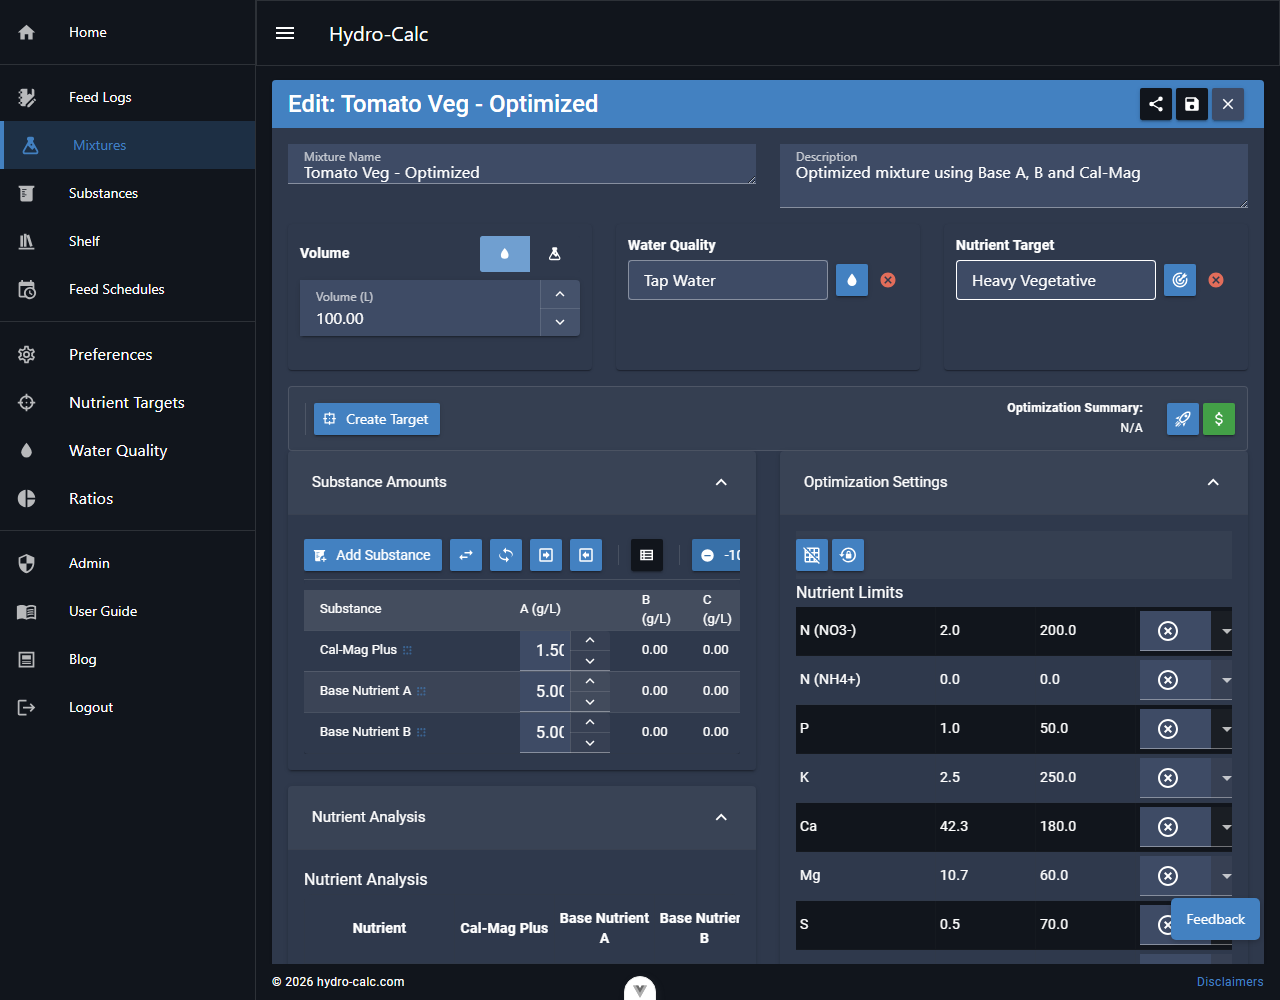
The Mixture Editor
The mixture editor is where you will spend most of your time when creating a new formula. It is a powerful and flexible interface that allows you to control every aspect of your mixture. The editor is divided into several sections, each with its own set of controls.
Main Toolbar
At the top of the editor, you'll find the main toolbar with the following actions:
- Save and Share: Saves the current state of your mixture and then opens a dialog to generate a shareable link.
- Save: Saves your mixture. It's good practice to save often!
- Cancel: Exits the editor without saving any changes and returns you to the previous page.
General Information
This section at the top of the editor allows you to define the basic properties of your mixture.
- Mixture Name & Description: Edit the name and add a description to keep your mixtures organized.
- Volume: Set the final volume of your nutrient solution in Liters.
- Water Quality Selector: Select a source water profile. The nutrients already present in your water will be factored into the final calculation.
- Nutrient Target Selector: Select a Nutrient Target. This is the desired final concentration of nutrients for your mixture.
- Substance Selector: Add substances from your Shelf to your mixture.
Stock Solution Mode
By default, the editor calculates recipes for a final reservoir volume (e.g., adding salts directly to 100L of water). However, many growers prefer to create concentrated Stock Solutions to be diluted later.
You can enable Stock Mode using the toggle buttons in the Volume section of the editor.
- Stock Volume: The volume of your concentrate container (e.g., 5 Liters).
- Dilution Ratio: The ratio at which you will inject this stock into your reservoir (e.g., 1:100).
- Total Capacity: The system automatically calculates the total volume of final nutrient solution this batch will treat (e.g., 5L * 100 = 500L).
Solubility Warnings: When in Stock Mode, the editor checks the solubility of your ingredients against the concentrated volume, not the final volume. This helps prevent precipitation and sludge in your stock tanks.
Recipe Instructions: The "Mixture Recipe" panel will automatically update to show instructions for mixing into your specified Stock Volume.
Substance Amounts
This section is for managing the substances in your mixture and their amounts. It uses a Substance Stack (A/B/C) system to help you iterate and compare different versions of your recipe.
- Amount A: This is your primary active recipe.
- Amount B & C: These store previous versions or alternative comparison points.
When you run an optimization, the result is automatically loaded into Amount A, and the existing values are "pushed" down the stack (A moves to B, B moves to C).
Pro Tip: Iterative Design
Use the Roll Stack action to cycle through your last three optimization attempts. This is perfect for comparing how different nutrient limits (like forcing more Potassium) affect the overall balance and cost of the recipe.
Toolbar Actions:
- Add Substance: Opens the substance selector to add a new ingredient from your Shelf.
- Swap Amount A and B: Swaps all values between your primary and secondary slots.
- Roll Stack: Cycles all values through the stack (A → B → C → A).
- Copy A to B: Overwrites the values in Amount B with your current active recipe (A).
- Copy B to A: Restores the values from Amount B back to your active recipe (A).
- Percentage Adjustments: Use the +/- 1% and 10% buttons to globally scale your recipe up or down.
Individual Substance Actions:
Within the substance table, each substance has its own set of controls to:
- Remove: Deletes the substance from your mixture.
- Adjust Amount: Manually enter the amount of the substance to use (in grams per unit of volume).
- Swap, Roll, Copy: Perform stack operations for a single substance.
- Adjust by %: Increase or decrease the amount for that specific substance by a percentage.
Nutrient Analysis & Chart
These panels provide a visual representation of the nutrients in your mixture based on the substance amounts you've entered.
- Nutrient Analysis: A grid showing the calculated PPM for each nutrient. It compares your current mixture's nutrient levels against your selected Nutrient Target.
- Nutrient Comparison: A side-by-side grid view comparing the totals for Amount A, B, and C against your target and their respective delta percentages.
- Nutrient Chart: A bar chart that visually compares the nutrient levels in Amount A, B, and C against your target. You can toggle the visibility of each dataset (A, B, C, Target) by clicking on its name in the chart legend.

Optimization Settings
Here, you can fine-tune the behavior of the optimization engine by setting limits.
- Reset Nutrient Limits: Removes all custom limits you've set for individual nutrients.
- Reset Substance Limits: Removes all custom limits you've set for individual substances.
- Nutrient Limits Editor: Set constraints for each nutrient (e.g., ensure Nitrogen is within a specific PPM range).
- Substance Limits Editor: Set constraints for each substance (e.g., limit the maximum amount of a specific substance to use).
Working with Limits
Limits are powerful constraints you can give the optimization engine to ensure the final recipe meets your specific requirements, whether they are chemical, practical, or cost-related.
Nutrient Limits
Nutrient limits control the final concentration (PPM) of each nutrient in the solution. The optimizer will try to minimize total ppm error against the target subject to these limits.
Pro Tip: "Locking" a Nutrient
If you need a specific nutrient (like Calcium) to be exactly 150ppm, set its limit to Between with both Low and High set to 150. This forces the solver to treat that nutrient as a hard constraint rather than a soft target.
When limits are set as bounds (such as above or below) then error is not considered but the solution must meet those requirements. You can use a tight between range to force the system to try to hit a certain target at the expense of others.
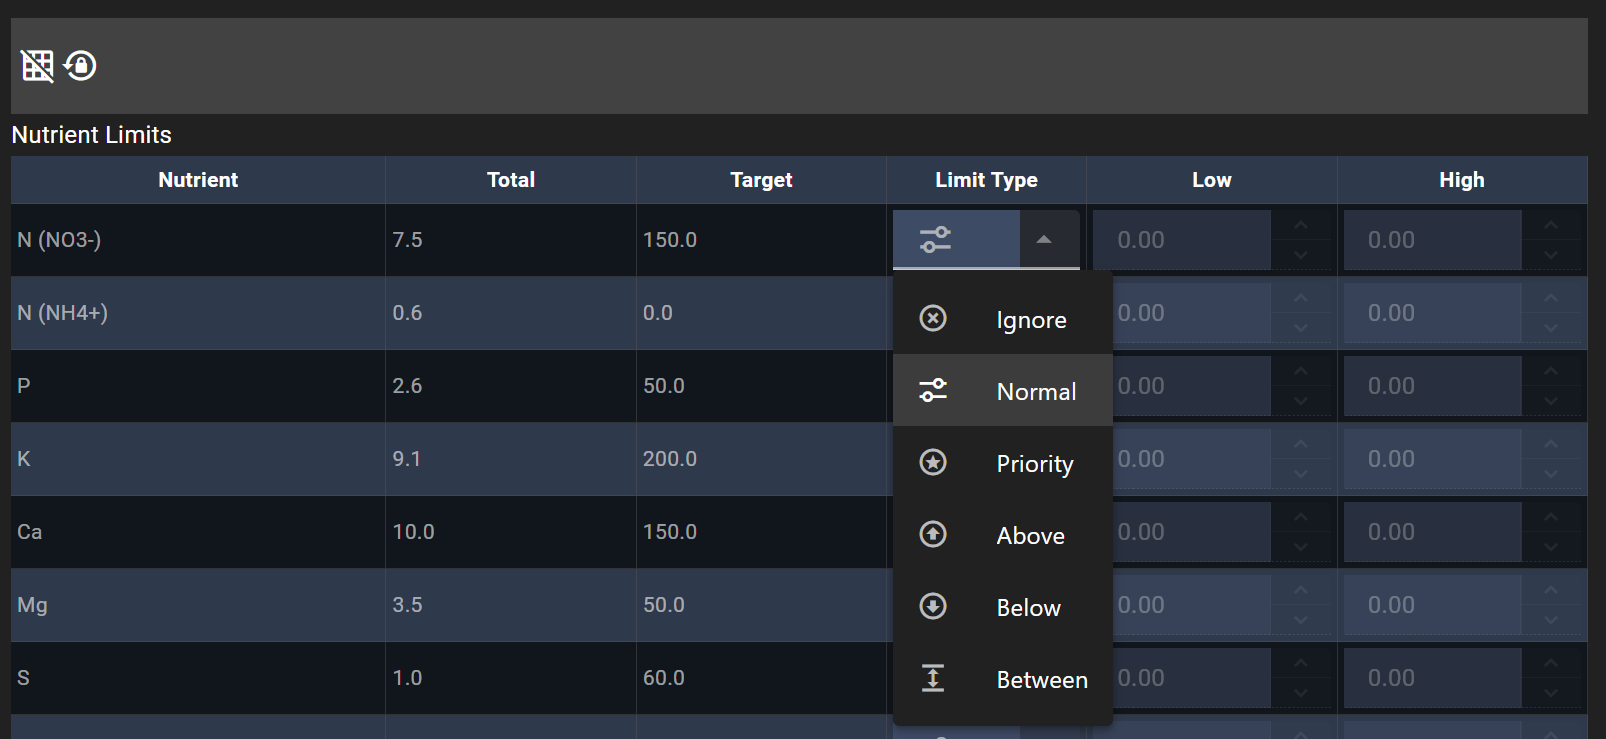
- Ignore: The optimizer will not consider this nutrient in its calculations.
- Normal: This is the default. The optimizer will try to get as close as possible to the target for this nutrient.
- Priority: The optimizer will treat this nutrient's target as more important than 'Normal' nutrients, trying harder to match the target PPM.
- Above: The final concentration must be at least the "Low" value you set.
- Below: The final concentration must be no more than the "High" value you set.
- Between: The final concentration must be within the "Low" and "High" range you specify.
Substance Limits
Substance limits control the amount of each individual substance used in the recipe. This is useful for managing inventory, avoiding solubility issues, or controlling costs.
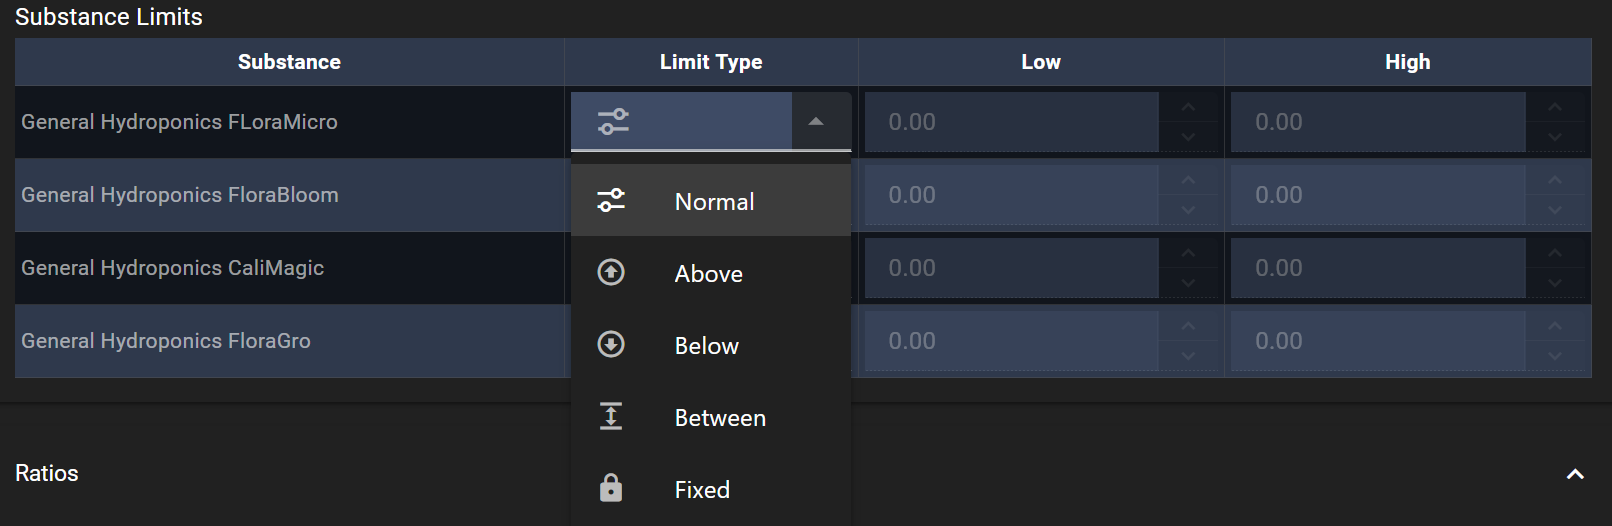
- Normal: The optimizer is free to use any amount of this substance to reach the goal.
- Above: The amount of this substance used must be at least the "Low" value you set.
- Below: The amount of this substance used must be no more than the "High" value you set.
- Between: The amount of this substance used must be within the "Low" and "High" range you specify.
- Fixed: The amount of this substance is locked to the value you enter. The optimizer will not change it and will work around this fixed amount to solve the mixture.
Analysis & Optimization Toolbar
This toolbar, located just above the main editor panels, contains actions related to analyzing and optimizing your mixture.
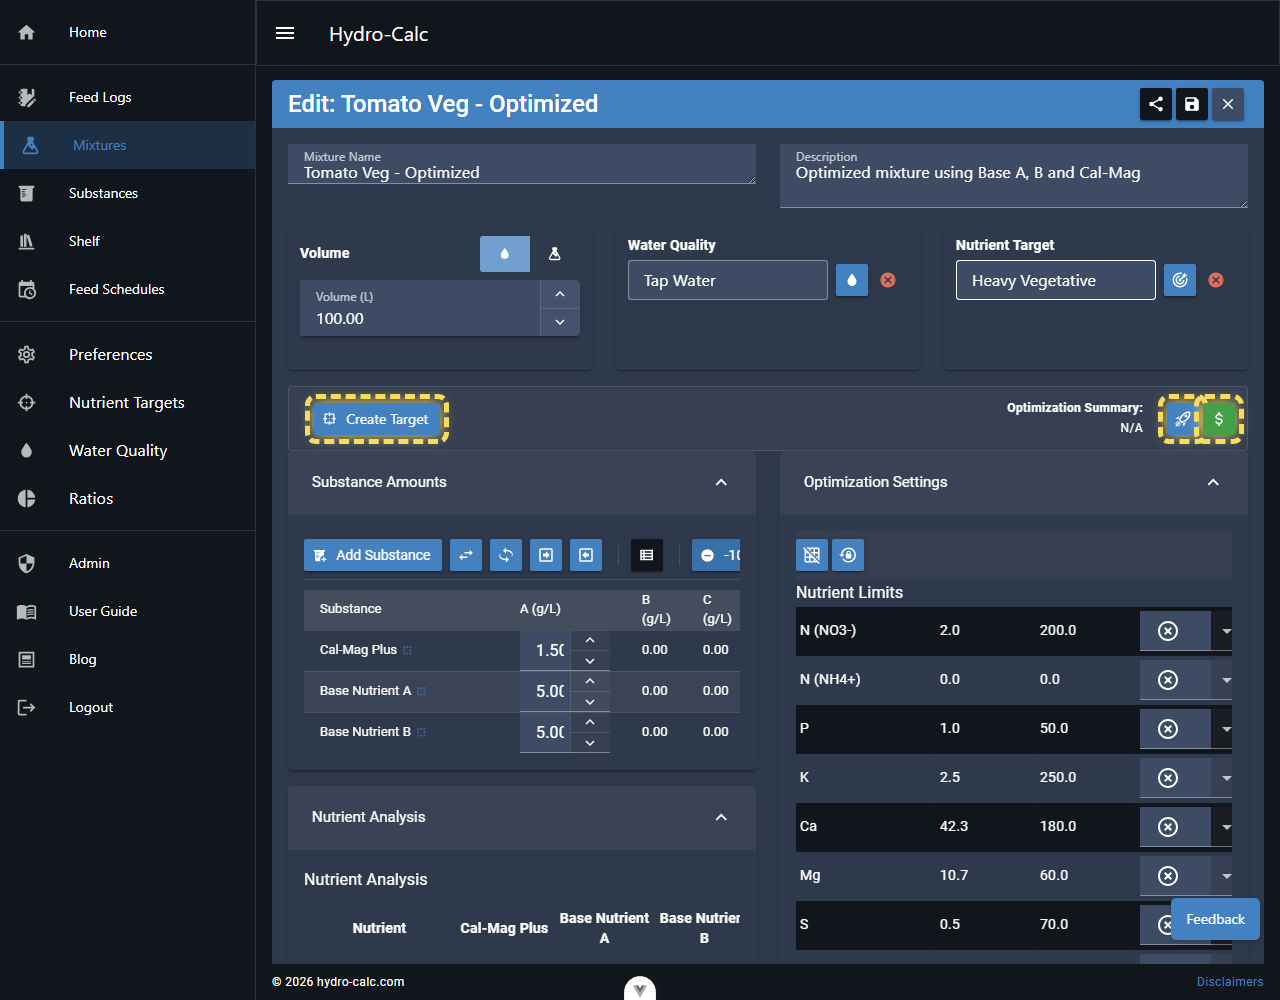
- Create Target: (Text Button) Saves the current mixture's calculated nutrient values (Amount A) as a new Nutrient Target.
- Optimization Summary: A panel that displays the results of your optimization, including the Total Error score (lower is better) or feasibility status.
- Run Optimization: (Rocket Icon) Sends your mixture, target, and constraints to the optimization engine to minimize error.
- Optimize Lowest Cost: (Dollar Sign Icon) Opens a dialog to optimize the mixture for minimum cost while keeping nutrient errors within a specified tolerance.
Registration Required
Running optimizations and creating nutrient targets from a mixture require a registered Hydro-Calc account. You can still manually enter substance amounts and browse the mixture editor without signing in.
Cost Optimization
In addition to the standard error minimization, you can optimize your mixture for the lowest cost.
Advanced Cost Optimization
For an in-depth guide on maximizing value and controlling expenses with this feature, check out our dedicated Cost Optimization Guide.
Clicking the Optimize Lowest Cost button (dollar sign icon) opens a dialog where you can specify a Max Error (ppm).
- How it works: The solver will find the cheapest combination of substances that keeps all Normal and Priority nutrients within
Target +/- Max Errorand otherwise following all other limits. - Requirements: You must have costs entered for your substances in your Shelf.
- Infeasibility: If the solver cannot meet your nutrient targets within the specified error range (e.g., the range is too tight), it will fall back to the standard Error Minimization mode and notify you.
Ratios, Cost Analysis, and Mixing Recipe
These panels display additional information derived from your mixture's composition.
- Ratios: Shows how your mixture's nutrient ratios compare to your saved Ratios.
- Cost Analysis: Provides an estimated cost for your mixture based on the substance prices you've entered on your shelf.
- Mixing Recipe: A step-by-step guide on how to mix your solution based on the calculated substance amounts.
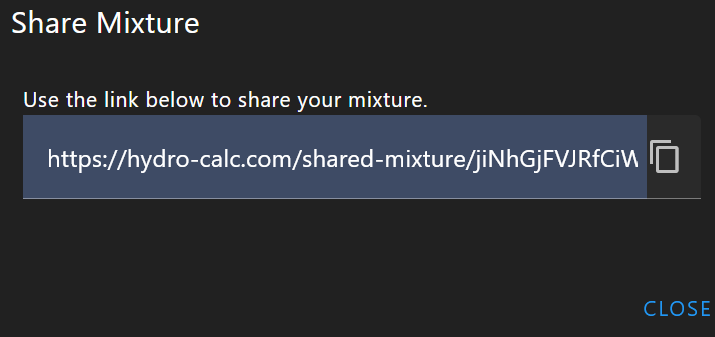
Sharing a Mixture
You can easily share your mixtures with other Hydro-Calc users. Simply click the Save and Share button (share icon) in the top toolbar. This generates a unique, public link.
Privacy & Security
When you share a mixture, we prioritize your privacy. The system creates a Snapshot of your mixture at that moment in time.
- What is Shared: Substance amounts (Column A), Nutrient Targets, Water Quality profile data, and basic settings.
- What is NOT Shared: Sensitive details like Store URLs and shelf data are removed from private substances, along with descriptions.
Importing a Shared Mixture
Please note that shared items, including mixtures and feed schedules, are automatically deleted if they are not viewed within 30 days.
You can import a mixture shared with you by clicking "Add to My Mixtures".
- Safe Import: This creates a completely new, independent copy of the mixture in your account.
- No Risk: Any changes they make to their copy do not affect the shared original mixture.
- Mapping: If the shared mixture uses global substances (like Calcium Nitrate), the system will use those directly. If a custom substance is used, it will be imported as a new custom substance in their library. The same applies to Water Quality or Nutrient Targets that are custom in the original mixture.